The inchworm to push-up is a dynamic compound bodyweight exercise that combines mobility, flexibility, and upper body strength into one continuous movement. It is commonly used in warm-ups, functional training routines, and full-body workouts due to its ability to activate multiple muscle groups while improving coordination and movement quality. This exercise builds upon the traditional inchworm by adding a push-up at the plank position, increasing its strength and conditioning benefits.
The primary muscle group targeted during the inchworm to push-up is the chest. The push-up portion of the movement places significant demand on the chest muscles as they work to press the body away from the ground. This makes the exercise effective for developing upper body strength while still maintaining its mobility-focused components.
Secondary muscles play an important role throughout the movement. The shoulders and triceps assist during the push-up phase, helping stabilize and extend the arms. The core muscles are continuously engaged to maintain a stable plank position and prevent excessive arching of the spine. The hamstrings are dynamically stretched during the walkout and return phases, improving flexibility and mobility in the posterior chain.
One of the key benefits of the inchworm to push-up is its ability to combine strength and mobility into a single exercise. Unlike isolated movements, this exercise trains multiple qualities at once, making it highly efficient for overall fitness. The dynamic stretch placed on the hamstrings improves flexibility, while the push-up enhances upper body strength.
This exercise also improves core stability and control. Holding a proper plank position during the push-up requires strong engagement of the abdominal muscles, which helps support the spine and improve posture. Over time, this can lead to better performance in other compound movements.
Additionally, the inchworm to push-up enhances coordination and body awareness. The transitions between standing, plank, push-up, and return phases require control and precision, helping develop more efficient movement patterns.
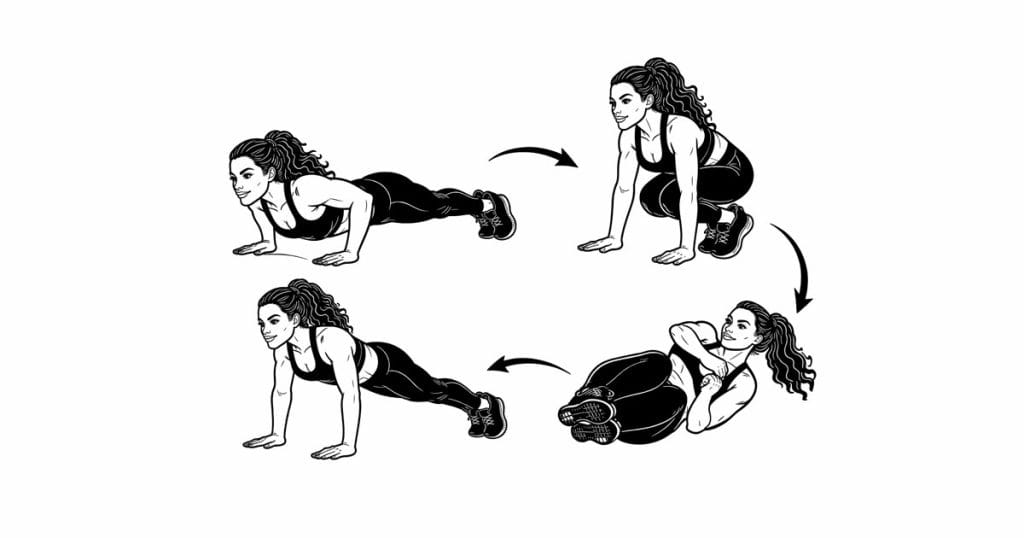
To perform the inchworm to push-up, begin standing upright with your feet hip-width apart. Hinge at the hips and place your hands on the floor, then walk them forward until you reach a high plank position. From there, perform a controlled push-up, lowering your chest toward the ground before pressing back up. Once back in plank, walk your feet toward your hands while keeping your legs as straight as possible, then return to standing.
Proper technique is essential for maximizing the benefits of this exercise. Focus on maintaining a strong core, controlled movement, and proper alignment throughout each phase. Avoid rushing through the sequence, as this can reduce effectiveness and increase the risk of injury.
Common mistakes include allowing the hips to sag during the push-up, bending the knees excessively during the walkout, and sacrificing form for speed. These errors can limit the benefits of the exercise and place unnecessary strain on the joints.
From a safety perspective, it is important to work within your current level of strength and flexibility. Modify the push-up if needed and gradually improve your range of motion over time.
Overall, the inchworm to push-up is a versatile and effective full-body exercise that improves strength, flexibility, and coordination. Its combination of movement patterns makes it a valuable addition to any fitness routine focused on functional performance and mobility.